
Cable wire railing is an excellent way to enhance both the aesthetics and safety of your home. Whether you're looking to improve your deck, balcony, or staircase, installing cable wire railing gives a modern and sleek look that is perfect for any contemporary home. However, installing cable wire railing can be a challenging process, and it's essential to follow the right techniques to ensure a safe and secure installation.
In this section, we will provide a step-by-step guide on how to install cable wire railing with the help of a professional. Following these expert tips, you can complete your project in an efficient and reliable manner, leaving you with a beautiful and safe cable wire railing system that will last for years to come.
Before embarking on a cable wire railing installation project, it is essential to understand the components that make up the railing system.
The following are the essential components required for cable wire railing installation:
| Component | Function |
|---|---|
| Cable wires | Provide tension and support for the railing system. |
| Tensioners | Used to adjust the tension of the cable wire. |
| End posts | Hold the ends of the cable wires and provide stability to the railing system. |
| Intermediate posts | Provide intermediate support and stability to the railing system. |
| Washers and nuts | Secure the cable wires to the posts. |
It is important to note that different railing systems may have additional components, such as top rails and bottom rails.
Understanding the components of cable wire railing is crucial for the success of your DIY installation project. By knowing the function of each part, you can make informed decisions about the materials and tools you will need to get the job done right.
Before starting the cable wire railing installation, it is imperative to have precise measurements and a solid plan. In this section, we'll guide you through the step-by-step process of measuring and planning for your cable wire railing project.
Measure the entire length of the deck or balcony. This is where your cable wire railing will be installed. Write down the measurements and mark them on a sketch of your deck or balcony.
Next, decide where to place the posts for the cable wire railing. They should be installed no more than 4 feet apart to ensure stability. Use a ruler or measuring tape to mark the location of each post on your deck or balcony sketch.
Determine the number of horizontal cable wires you'll need between each post. A reasonable space between cables is 3 inches, so calculate the number of cables needed based on this measurement.
Measure the distance between each post to determine the length of cable needed. Multiply the distance by the number of cables to determine the total length of cable needed for your project.
Based on your measurements and plans, create a comprehensive list of materials and tools needed for the installation. This list should include the following:
Having a detailed list of materials and tools needed will help you purchase everything required before starting the installation process.
Following these steps will help ensure that the cable wire railing installation process proceeds smoothly. Keep in mind that proper measurements and planning are crucial to achieving a successful outcome.
Proper planning and using the right tools and materials can make all the difference when it comes to installing cable wire railing. Here are some essential tools and materials needed for a successful installation:
| Tools | Materials |
|---|---|
| Drill with bits, Wrench, Screwdriver, Level, Tape Measure, Cable cutter, Swage tool, Eye bolt wrench, Cable railing tension gauge, Hammer, Wire brushes | Cable wire railing kit with fittings and cable, Wood or metal posts, Mounting brackets, Washers and nuts, Wood or metal screws, Protective gloves and eyewear, Paint or stain (if desired) |
When choosing cable wire railing kits, be sure to select a kit that suits your installation needs. There are various kits available with different cable lengths and fittings. Reading the manufacturer's instructions carefully and ensuring that all tools and materials are on hand can make your installation process easier and quicker.
Before installing the cable wires, it is crucial to ensure that the posts and framework are stable and properly prepared. Following these steps will ensure a successful installation:
It is essential to make sure that the posts are properly secured to the framework to prevent any wobbling or shaking once the cables are installed. A wobbly railing system can compromise safety and may require professional assistance to fix.
| Tools | Materials |
|---|---|
| Measuring tape | Posts |
| Marker | Drill |
| Saw | Hardware |
| Level | |
| Drill bits |
Properly preparing the posts and framework is an important step in the cable wire railing installation process. It may be helpful to consult a professional for guidance, especially if working with a larger or more complex installation.
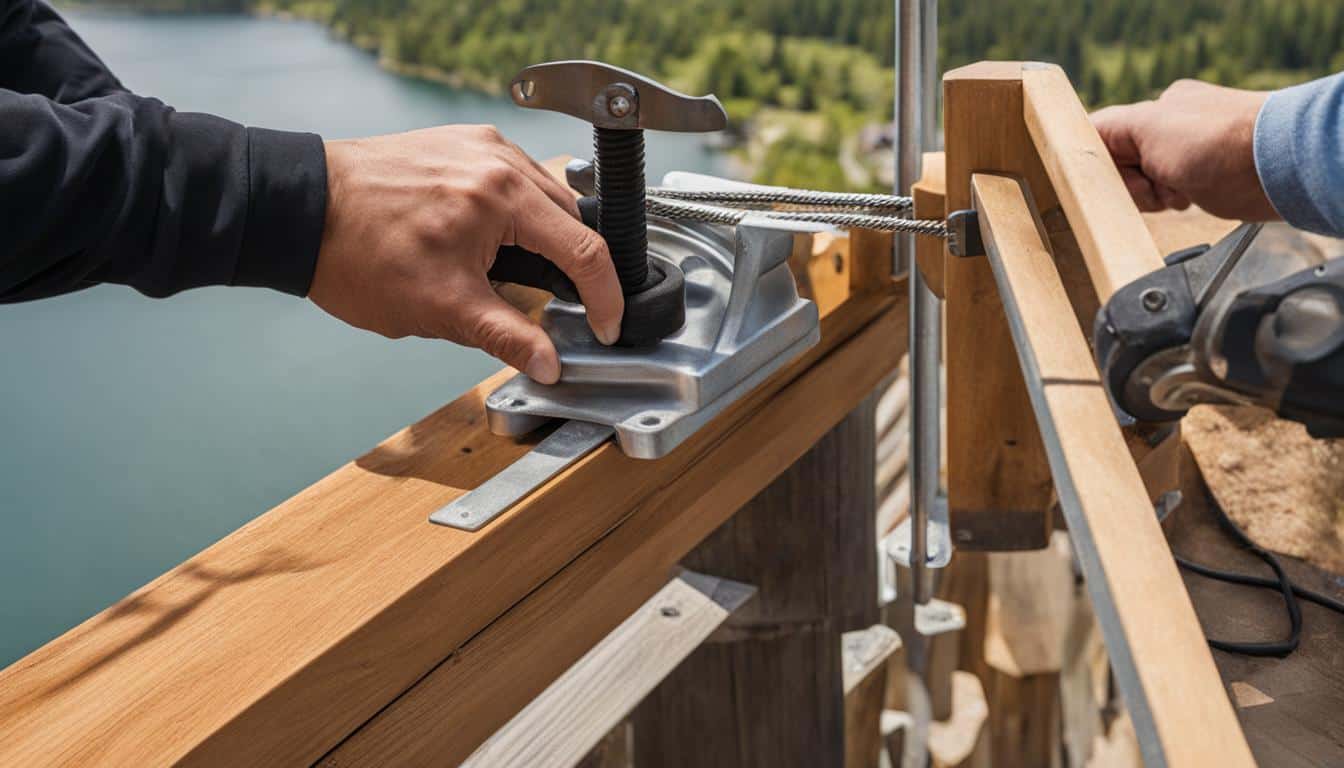
Now that you have all the necessary tools and materials, and your posts and framework are ready, it's time to install your cable wire railing. This section will provide you with step-by-step instructions on how to install cable wire railing in an easy way.
Note: It is important to follow these instructions carefully to ensure proper installation and safety.
Tip: It's always a good idea to double-check your work and ensure that all cables are properly secured and tensioned before using the railing.
If you're installing cable wire railing on stairs, the process is similar to installing it on a level surface, with a few additional steps:
Tip: When installing cable wire railing on stairs, it's important to make sure that the railing is properly secured to the floor and that the cables are properly tensioned to ensure safety.
After completing the installation, regular maintenance and safety checks are critical to ensure your cable wire railing continues to function safely and look great. Below are some essential tips and tricks to keep in mind:
By regularly performing these maintenance tasks and safety checks, you can ensure the longevity and safety of your cable wire railing.
Installing cable wire railing not only provides safety but also adds a modern and sleek look to your space. However, there are various ways to enhance the aesthetics of your cable wire railing to complement your personal style. Here are some ideas:
The finish of your cable wire railing can make a significant impact on the look of your space. Stainless steel is a popular choice due to its durability and sleekness. However, you can choose from a range of finishes, including matte black, brushed nickel, and bronze, depending on your preference.
If you want to add a pop of color, consider painting your cable wire railing. Be sure to use a paint that is suitable for exterior use and can withstand exposure to sunlight and changing weather conditions. Alternatively, you can choose cables with colored coatings to add subtle accents.
Accessories can add a decorative touch to your cable wire railing. Some options include post caps, end caps, and decorative collars. However, be sure not to obstruct the view or compromise the structural integrity of the railing system.
"Adding decorative elements to your cable wire railing can enhance the overall look and feel of your space, but be sure not to compromise the safety of the installation."
While installing cable wire railing, some issues may arise that can hinder the installation process. Here are some of the common issues with their possible solutions:
One of the most common issues with cable wire railing installation is uneven spacing between cables.
Solution: To fix this issue, start by loosening the turnbuckle where the uneven spacing is occurring. Then adjust the cable tension by tightening it to the same level as the other cables. Once the tension is equal, fasten the turnbuckle back in place.
Sagging cables is a common issue, which can occur when the tension is not tight enough.
Solution: Loosen the turnbuckle to create more tension on the cable. If this does not work, you may need to add additional tension to the cable by adjusting the turnbuckle at the opposite end. Use a tension gauge to ensure that the cable is at the correct tension level.
Loose anchor points are another common issue with cable wire railing installation.
Solution: Re-tighten all of the anchor points and check for any loose hardware, such as bolts or screws. If any hardware is missing or damaged, replace it immediately.
By following these simple troubleshooting tips, you'll be able to resolve many of the common issues that can arise during cable wire railing installation. If you encounter any other problems, it's always best to consult a professional to ensure the safe and proper installation of your railing system.
Installing cable wire railing is a great way to enhance the safety and the overall look of your space. However, it is vital to prioritize safety throughout the installation process. By following the step-by-step instructions provided in this article, you can ensure a secure and stable cable wire railing system.
Remember to measure accurately, plan carefully, and use the right tools and materials. Also, regularly perform maintenance and safety checks to keep the system in good condition and ensure continued safety.
If you encounter any installation issues, do not panic. Refer to the troubleshooting tips provided in this article to help you overcome any challenges. In case of major problems, consider seeking assistance from a professional. They can help resolve the issue and ensure a successful installation.
Cable wire railing offers a stylish and secure solution for many spaces. By following the steps outlined in this article, you can install it with ease and ensure its longevity. Always prioritize safety, proper installation, and regular maintenance to maintain the integrity of the system over time.
Cable wire railing is a type of railing system that uses stainless steel cables as the primary infill material. It offers a sleek and modern look, allowing unobstructed views while maintaining safety.
Cable wire railing provides several benefits, including durability, low maintenance, and high visibility. Cable wire railing is a popular choice also for its modern and minimalist aesthetic.
The height of your cable wire railing should comply with local building codes. It is typically recommended to have a minimum height of 36 inches for residential applications and 42 inches for commercial applications.
While some specialized tools may be helpful, basic tools such as a drill, wrench, and level are usually sufficient for cable wire railing installation. It is important to follow the manufacturer's instructions and use the appropriate tools for a secure installation.
Yes, cable wire railing can be installed on stairs. However, additional considerations may be necessary, such as adjusting the cable tension and ensuring proper stair tread spacing.
Regular cleaning and maintenance are important to keep your cable wire railing looking its best. Use a mild detergent and water solution to clean the cables and framework, and inspect for any signs of damage or loose connections. Avoid harsh cleaning agents that may damage the stainless steel cables.
Yes, cable wire railing can often be installed on existing structures. However, it is essential to ensure that the structure is suitable and can support the additional load and tension of the cables. Consulting with a professional or following manufacturer guidelines is recommended.
Cable wire spacing requirements may vary depending on local building codes and regulations. The spacing between individual cables should be small enough to prevent children from squeezing through, typically 3 to 4 inches apart. Always check local codes and guidelines to ensure compliance.
Yes, cable wire railing is suitable for coastal areas. The use of stainless steel cables ensures resistance to corrosion and rust, making it a durable option for environments with high moisture and salt exposure.
Yes, cable wire railing can be customized to suit your style and preferences. Options for customization include choosing different cable thicknesses, finishes, and adding accessories such as handrails or post caps.
VIEW OUR WORK
LEARN MORE
CONNECT WITH US